6 Pro Tips for Insulating Your Attic
There’s no doubt that a well-insulated home stays warmer in winter, cooler in summer, and saves you money all year round through lower energy bills. And reducing energy consumption is particularly important nowadays as the cost of natural gas, propane and home-heating oil continues to rise.
Everyone knows that it’s crucial to insulate the exterior envelope of the home, especially the exterior walls and floors above crawlspaces and basements. But few homeowners realize that the very most important place to insulate is the attic floor. And that’s an issue because attic floors are often woefully lacking in insulation.
A poorly insulated attic floor will allow heated air from below to migrate up into the attic, creating chilly rooms and costing you money. And in extreme cases, the heat leaking into the attic can warm the underside of the roof, which melts snow that can lead to damaging ice dams. And in summer, inadequate attic insulation can make the rooms below stifling hot, which puts undue stress on your air conditioning system and uses more electricity.
So, how do you know if your attic is properly insulated?
Here’s one simple way: Take a peek up into the attic. If you can see the tops of the ceiling joists, then you don’t have enough insulation. Generally speaking, regardless of where you live in the country, you should have about 14 to 16 inches of insulation on the floor of your attic. That’s equivalent to approximately R-60; for comparison, R-30 insulation is about 9 inches thick.
(The R-value measures the effectiveness of insulation to resist to the passage of heat through walls and ceilings. The higher the R-value, the greater the energy efficiency of the insulation.)
The good news is that adding insulation to an attic is very DIY-friendly and you can use virtually any type of insulation, though the most popular and affordable by far are fiberglass batts or rolls, mineral wool batts, and loose-fill fiberglass or cellulose. When adding fiberglass to an attic that already has some existing insulation, it’s important to use un-faced insulation, which does not have kraft paper or foil moisture barrier applied to one side.
In the unlikelihood that your attic has no insulation, then first install faced insulation, making sure the facing—paper or foil—is placed down against the backside of the drywall ceiling. (Insulation facing should always face toward the conditioned space, meaning the area that’s heated and/or air-conditioned.) Then you can enhance the energy efficiency of the attic by laying un-faced insulation on top of the existing insulation.
It’s hard to give exact costs for insulation since prices vary widely from region to region, but here are some ballpark estimates for un-faced R-19 insulation, which is about 6 inches thick: fiberglass batts or rolls, 75 to 90 cents per square foot; mineral wool batts, $1.70 to $1.90 per square foot; loose-fill fiberglass, 40 to 60 cents per square foot; loose-fill cellulose, 30 to 50 cents per square foot.
Loose-fill insulation is also known as blown-in insulation. It’s typically installed using an electric blower and long hose, but you can also simply spread the loose bits of insulation across the attic floor by hand or with a leaf rake. Caution: When installing any type of insulation, it’s important to wear long sleeves, pants (not shorts), snug-fitting eye goggles, and dust mask. I’d also suggest wearing a hard hat or some kind sports helmet to protect your noggin from inevitable run-ins with the roof rafters.
Okay, so we know that a properly insulated attic will reduce energy consumption, lower utility bills, and make your home feel cozier throughout the year. However, to fully realize these savings and benefits, it’s imperative that the insulation is installed correctly. Here are six pro tips for properly insulating attics:
1. Seal All Ceiling Penetrations
Before you start adding new insulation, take a close look at the attic floor and you’ll likely see many holes where wires, pipes, hoses, vents and other mechanical components poke up into the attic. The small gaps around these penetrations allow warm air to seep into the attic. Prevent this by sealing all gaps with fireproof caulk, which is often labeled as fire stop or fire barrier. Do not use regular caulk to seal these penetrations, it’s not fire-code compliant.
2. Fill All Voids
The number one attic-insulation mistake is leaving gaps and spaces between and around the insulation. Insulation can’t do its job if it’s not completely filling all voids between the joists. Even the smallest, seemingly insignificant gap allows warm air from the house to leak into the attic. That not only wastes energy, but also makes your furnace work harder, which can eventually shorten its life.
So, be sure to cut and fit the insulation to fill each and every gap, but don’t force it down into spaces. Compressing insulation reduces its effectiveness (see tip No. 5). And when installing batts or rolls of insulation, lay them perpendicular to the ceiling joists, butting them tightly together. Laying the insulation across the joists will ensure total, gap-free coverage.
3. Beware of Vents
Most homes have vents that allow fresh air to enter and exit the attic. The constant airflow helps exhaust moisture and condensation and prevents the growth of mold and mildew. Attic vents are typically installed in the soffit, along the underside of the eave, along the ridge at the peak of the roof, or on the gable ends of the house.
When insulating an attic, be careful not to put any insulation over the vents, which will block airflow and cause a myriad of troubles. Be especially careful when using loose-fill insulation, which can easily be accidentally pushed or blown over vents.
4. Look for Recessed Lights
If there are standard recessed light fixtures in the ceiling below the attic, be careful not to lay insulation on top of the fixtures. These lights create a tremendous amount of heat, which could ignite the insulation and cause a house fire. Keep all insulation at least 3 inches away from recessed light fixtures. Note that this warning relates only to standard Non-IC recessed fixtures.
If the recessed fixtures are IC-rated—which stands for Insulation Contact—then you can safely lay insulation right on top of the lights. If you’re not sure which type of recessed fixtures are installed in your home, call in a home inspector or licensed electrician. And keep the insulation well away from the fixtures until a determination has been made.
5. Compressing the Insulation
Another common mistake that DIYers make is tightly stuffing insulation into place, which seems to makes sense since you’re trying to block out cold air. However, the exact opposite it true and here’s why: Insulation is typically rather soft and fluffy because it’s filled with air, and that trapped air helps insulate. If insulation is compressed too tightly, the air is forced out and the insulation loses much of its insulating value. So, when installing insulation to your attic, avoid stuffing it too firmly into place.
6. Don’t Forget the Attic Entry
Most attics have an access panel, hatch, fold-back door or pull-down staircase. It’s important to insulate these access openings to block the flow of warm air into the attic. And some of these openings can be pretty big—8 to 10 sq. ft.—which would result in some serious heat loss.
You could simply lay insulation on top of the access opening, but then you’d have to push it out of the way and reposition it again each time you go into the attic. A better solution is to buy a ready-to-install insulated attic door or attic stair cover. These products provide an easy way to create an airtight seal over the attic access and they’re quick to install and relatively affordable starting at about $60.
[Sidebar]
Recommended R-Values for Attic Insulation
The map below shows recommended R-values for attic insulation in eight different regions—or zones—in the U.S. Note that there are R-values for attics with no insulation, and also for attics that have currently 3 to 4 in. of existing insulation.
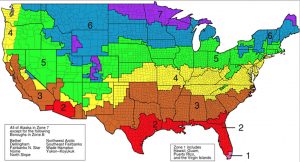
Climate Zone No Existing Insulation 3 to 4 Inches of Insulation
Zone 1 R30 to R49 R25 to R30
Zone 2 R30 to R60 R25 to R38
Zone 3 R30 to R60 R25 to R38
Zone 4 R38 to R60 R38
Zones 5 – 8 R49 to R60 R38 to R49
Source: U.S. EPA and EnergyStar.gov
You must be logged in to post a comment.