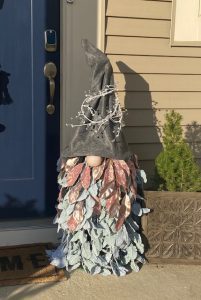
DIY Gnome For The Holidays!
Bring Home The “Gnome” For The Holidays!
Christmas will be here before you know it, and so right now is the time to get your decorations going!
This fun gnome will take some time to create, but it isn’t very difficult, and will brighten any front porch!
So what do you need?
Wire Cutters
Floral Wire
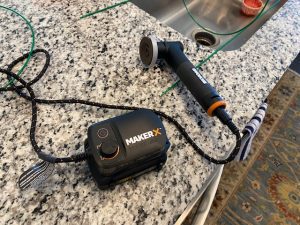
MakerX with the angle grinder attachment
3 foot tomato cage
Glue Gun
20×20 piece of felt (choose a color that will go with the color scheme of your gnome)
About 35 floral stems (be sure to pick some that you can adjust the leaves on… magnolia work best)
Loft Batting (Or cotton Balls)
Tan or nude nylons (this is for the gnome’s nose)
Coiled Garland to decorate the gnome’s hat (optional)
Pipe Cleaner (or a sturdy rubber band)
Worx Zipsnips
So how do you make it?
First thing you need to decide is where you are going to want to place your gnome.
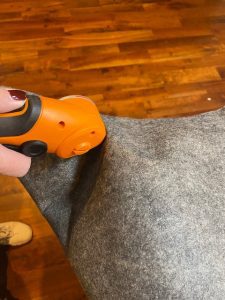
If Inside, then you really don’t need to do anything to your tomato cage, but if outside you will want to find a bucket to fit the tomato cage in, and you will need to trim off the bottom circle of the tomato cage too. To do this you will need to use your MakerX with the angle grinder attachment and cut off the bottom circle of the tomato cage. This will leave the prongs. Put a heavy stone or brick in the the bottom of the bucket or planter and then place the prongs in as well. The pressure from the prongs will hold the tomato cage in place. Make sure when using the angle grinder you are wearing protective eye and hand coverings as the tomato cages are metal.
If you are keeping your tomato cage inside…
Flip the tomato cage upside down so the circle is on the ground. This will leave the prongs up in the air. Make sure the prongs are all the same height and you may want to trim them a bit with the MakerX angle grinder, or if they are sharp you can grind them down a bit to round the edges. Pull the prongs together and hold them in place with a rubber band or a pipe cleaner.
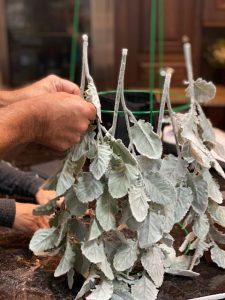
Next up, take your floral pics and fluff them out. Then, hold them up to the tomato cage and place them so that they touch the floor just a little bit. (If in bucket or planter they would touch the top of the bucket or planter or can hang down a bit further. It is your preference). I clipped the tops of the floral pics so that they weren’t too heavy or too high because you will be doing two rows to cover the 3/4 of the cage (You leave some open at the top because that will be covered by the hat.
Attaching the floral pics…
Usually I will pre cut some wire ahead of time (about 2-3 inches long per piece) and starting along one of the horizontal bars wire the floral pics to the tomato cage. I do a criss cross letter x to hold them in place. Work your way around the bottom until you have it all covered.
For the second row you want to definitely trim the floral pic stems after measuring for placement. Making sure the stems overlap a bit with the first row so that there are no holes in the Gnome’s beard. Continue to attach the stems in the same fashion, and don’t worry if they don’t cover all the way to the top. The gnome’s hat will cover the rest.
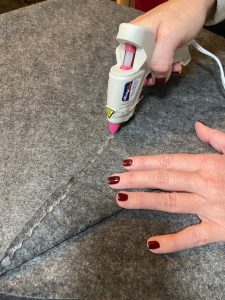
Speaking of the hat… Time to plug in the glue gun!

Use your 20×20 piece of felt and fold it in a triangle shape with one side lining up edge to edge.
Lifting up the top piece, place the glue on the bottom edge and then with light pressure you will place the top layer back on. (YOU GLUE ONLY ON ONE SIDE! LEAVE THE BOTTOM OPEN!)
Once the glue is dry (this will only take about 5 minutes) you will then want to get the Zipsnips!
Along the open edge of the felt you will want to create more of a swoop for the front of the gnome’s hat. Start about 2 inches up and then swoop down along the front and then back up on the other side about 2 inches again. If you are afraid you may cut it too short then you may want to trace it with a chalk pencil or pen to cut along.
Turn the hat inside out so that the seam from gluing is now on the inside. Take a pen or pencil and GENTLY poke the tip of the hat from the inside so that it will have a point.
Now for the nose….
Take the pair of nylons and cut off the edge of the foot, and then cut again about 6 inches up the leg. Taking a handful of loft battling or cotton balls, stuff into the nylons leaving room on wither side so that you may tie it to the tomato cage. How big the nose is is completely up to you, but it should be big enough so that it stands out on the front of the gnome.
Find a space towards the top of the second row (but not all the way at the top) where the nose will be able to be tied to the cage and tie it in.
Now it is time to place the hat!
Gently put the hat over the top of the tomato cage. Adjust it so that it comes down over the nose a bit but doesn’t completely cover it. You may need to fold the bottom a bit to make this work. Once you have everything where you want it you can now place the coiled garland around the hat to decorate it… and you are done!


You must be logged in to post a comment.