DIY Holiday Topiaries: A Perfect Holiday Decoration!
Easy DIY Holiday Topiaries That Anyone Can Create!
How is your holiday decorating going?
Is your front porch or inside decorating looking a bit bleak this year? Looking to add some color and creativity but don’t think you are “crafty” or creative? These DIY holiday topiaries are not only easy to create, but are fun and will leave your friends thinking you are incredibly talented! Best of all, you can make them as simple or complex as you desire.
What materials will you need? Links for everything needed below!
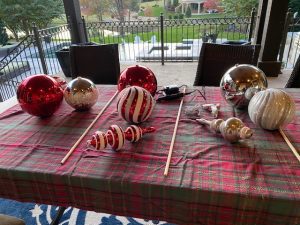
- Ornaments.
Pick 3-4 ornaments that you feel look good together and have them be different in sizes.
Larger to small. We used 3 ornaments, but if you want a taller topiary you will want to use 4.
Make sure they are shatterproof, and not glass. We recommend a unique ornament for the top. Maybe something with a pointed top. - Base basket or pot for your topiary.
We used a fun snowman hat basket from Michaels, but you can use pots or urns as well. Make sure they aren’t too deep or you will need to build up the base so that your topiary will be seen. - Heavy stone or brick for each basket or plant. This is placed in the bottom of the planter or basket to keep from blowing away if light.
- FloraCraft® CraftFōM 8″ Half Ball White.
Michaels and other craft stores have these. Use this in bottom of planter or basket to place the topiary rod in and hold in place. - Foam blocks.
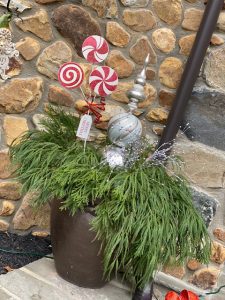
These are placed around topiary rod to hold in place as well. - Greenery or holiday Garland.
This is placed around the base of the topiary for decoration.
We used garland and also used greenery that cut from trees in the backyard. - Glue Gun.
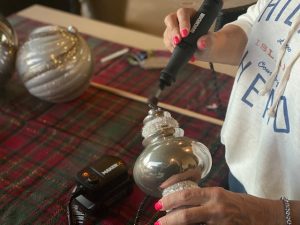
Make sure you have enough glue sticks! - MakerX Rotary Tool with sanding or buffing bit.
This is used to smooth out any rough edges from drilling holes in ornaments. - 20V Power Share Switchdriver Cordless Drill & Driver w/ 67 PC. Kit.
If you don’t have the kit it is ok, just make sure you have the flat, paddle, or spade bit that will provide the size hole needed for the dowel rod. - Wooden Dowel Rod. We used the 36” dowel, but if you are using more than 3 ornaments make sure they will fit on the dowel with enough room to place in the craftfom ball and be sturdy. This may need to be more than 36”.
Ready To Get Started?
Holiday Topiaries Step By Step
Now that you have all of your supplies for the Topiaries, lets get started.
First, you will want to set out the ornaments and dowel rod for each topiary. Line them up as you would like to have them assembled.
Using your drill and paddle bit drill a hole thru the bottom of each ornament. Then drill a hole using the same bit through the top of each ornament EXCEPT The ornament that will be on top.

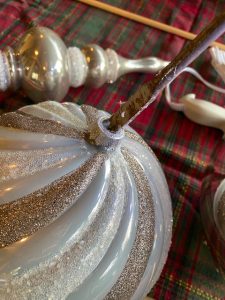
Once done drilling holes in ornaments, take MakerX rotay tool and smooth any rough edges. These will usually be on the tops of the ornaments where you have drilled through.
Putting the topiaries together.
Plug in your glue gun.
When glue gun is hot you are ready to proceed.
Take the ornament that will be at the top of the topiary. Place glue on the top of the dowel rod and place dowel into ornament until it reaches the top. Hold it here for 2 minutes to make sure glue holds in place.
Place glue at base of top ornament around the dowel.
Next you will place the next ornament on the dowel rod. This should be done with the top of the ornament touching the bottom of the one already on the dowel. Add additional glue at connection point and hold into place for a couple minutes until connected.
Repeat above with next ornament. If this is your bottom ornament you will want to place additional glue at bottom point of final ornament. If it isn’t, repeat above until final ornament is on and then place additional glue.

Set topiary aside and let glue completely dry.
Prepping your baskets or pots.
While letting glue completely dry you can prep your topiary container by placing stone or brick in it to add weight. (Note: If planter or container is heavy enough you won’t need the stone or brick and can skip)
Place the foam half ball flat in bottom of container, flat side down.
When dry, place topiary into the foam ball. If too high you can always use the MakerX angle grinder to trim bottom of dowel rod.
Add glue to secure in place.
Place foam blocks around and under the bottom ornament for extra stability.
Using greenery or garland decorate your topiary/container to your liking. Below you will see both a garland version and a greenery version.
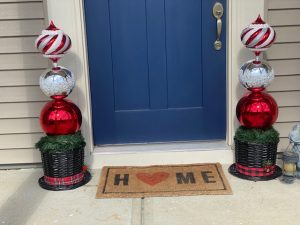
Place on porch or in house and enjoy!
Find out more about the all new MakerX from Worx below!


You must be logged in to post a comment.