Easy DIY Holiday Craft Project The Whole Family Can Do!
DIY Yarn Hats Are A Great Holiday Craft For The Entire Family!
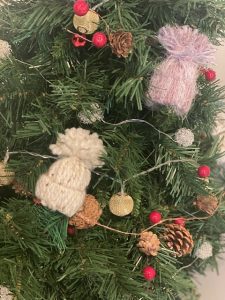
The holidays are looking a lot different this year, and families are finding they need to find fun, creative ideas that are easy for everyone! We tried this holiday yarn hat craft and found it was so easy and creative too. Kids can have fun choosing their own colored yarn and finding the perfect spot on the tree! The yarn hats themselves can be placed around the house, on the tree, or you can even thread some twine through and make garland out of them as well.
So What Do You Need?
To complete this craft it really doesn’t take much!
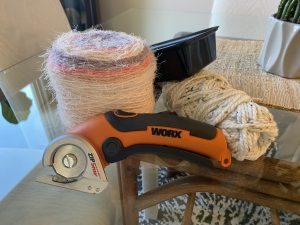
1. Yarn
You can use pretty much any yarn for this, but keep in mind the thinner the yarn is, the more you will need and longer it will take to make the perfect hat. I used a smaller-medium size yarn (you see on the right) and it was perfect. The yarn on the left took a lot more time, but it was super fun to see the result.
2. Scissors
We used the Worx ZipSnips! These are terrific for pretty much everything holiday and day to day for most of your cutting needs. A great holiday gift, they fit perfectly in the stocking too! (Hint Hint)
3. Something to wrap the yarn around.
We used an old take out container from PF Changs (cleaned it out first of course), but you can use a small notebook, and anything that will provide you with about 6-7 inches of yarn in length. If you don’t have something to wrap it with not to worry, just cut about 40 pieces of yarn that are 7 inches in length.
4. Cardboard tube from paper towel or toilet paper.
Either will work!
5. Cotton balls or Loft Batting
This is used to fluff up the hats.
So How Do You Put Them Together?
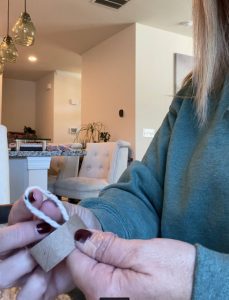
1. First you need to cut up slices on the cardboard tube. We cut approximately 1 inch slices using the Zipsnips, cutting horizontally.

2. Next you will wrap the yarn around your container and then cut. This will leave you with the pieces of yarn needed to loop and make the hat!

3. Now it is time to get started on the hat! Take one of your cardboard slices and start looping the yarn.
Fold a piece of yarn in half, creating a loop. Insert the loop inside the cardboard slice, and then in a slip knot fashion pull the bottom of the yarn over the slice and through the loop. Gently pull tight. Continue doing this around the entire cardboard slice until the yarn is completely covering the slice. See below.

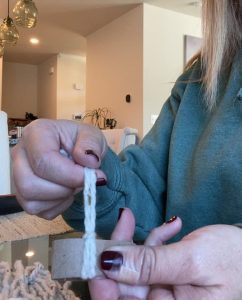
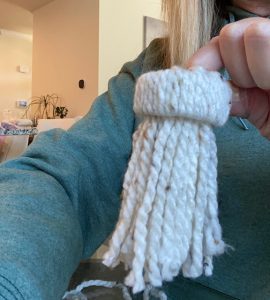
Once you have looped the yarn all the way around the slice it should look like this.
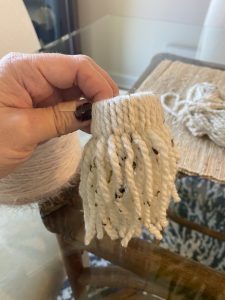
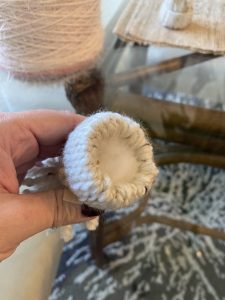
4. next you will take all the pieces of yarn that are hanging and push them up through the middle. Make sure you have them all the way pulled through and straight. It should look like this.
Now Let’s Turn It Into A Hat!
So now that you have your yarn all in place, let’s get to the fun part!
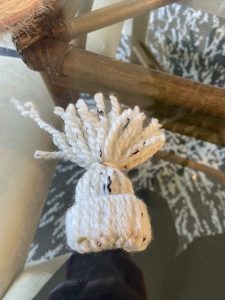
5. Closing the top.
Place one of the unused pieces of yarn horizontally on the table, and then place the hat on top. It should look like this:

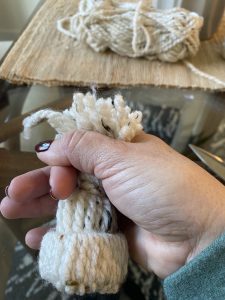
6. Placing the yarn about halfway up the top, tie a double knot. Then flip it over and do it again.
Now you can trim the top of the hat so that it is as short or long as you prefer! To keep them all in place we pinched the yarn while cutting, making sure to cut far enough away from hands!

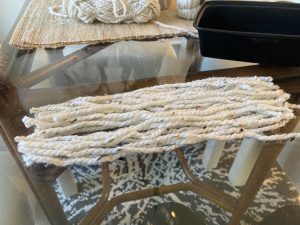
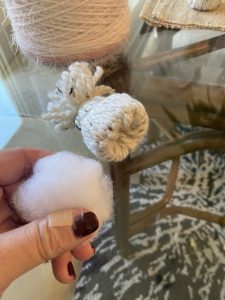
7. Once you have the beanie cut to your desired length you can add in a cotton ball or some crafting batting to fill out the hat. Be careful not to add too much as it will start to show through the yarn. You can also take a needle with thread or yarn and thread through the individual hats to create a yarn hat garland!
Make sure to share your results on social media and tag WorxTools, you never know who may notice and want to send you a fun gift!
Happy Crafting, and Happy Holidays from Worx!


You must be logged in to post a comment.